Happy FRIDAY everyone! I am SO glad it is Friday... Seriously. And, we are going to have weather in the 70's, so a trip to the zoo with the hubs and kiddos may be in order... especially since our zoo membership expires soon! Hope y'all have some fun plans for this weekend.
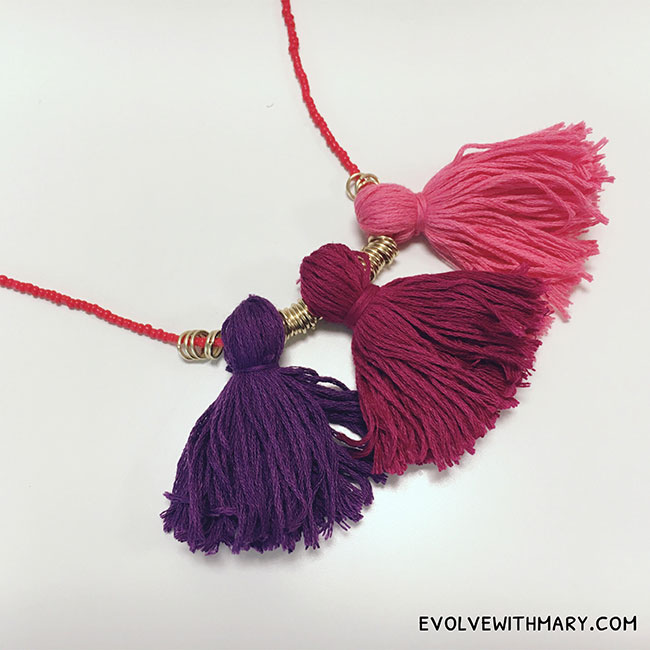
Today I have a guest post from Mary who blogs over at Evolve with Mary. Mary is my newest blog friend, I just think she is the cutest in her videos. She definitely shows her true personality and that is something I still need to work on when I take videos. She is also crafty... and loves to talk about health... and, well, she just writes about a lot of things I like to read about. So, let me introduce you to Mary and her DIY Tassel Necklace Tutorial (and VIDEO!) today. Be sure to give her some love in the comments, visit her blog and You Tube channel!! You def. want to know her, she is super hip! :)
I love jewelry. I always admire chunky bracelets, eye-catching rings, dangly earrings, anything that sparkles and shines. Sadly I'm pretty basic when it comes to my jewelry choices. I enjoy understated studs, simple necklaces, and funky rings, which aren't killing it in the fashion department. Sometimes you need to jazz up a maxi dress with a long necklace or enhance the basic white shirt with colorful earrings. Notice I said I don’t wear fun jewelry often. I have rings and shiny things galore. A few years ago I went crazy over H&M jewelry; it's affordable, adorable and unique. Now I'm sitting at my vanity with tons of cool pieces that I just never wear.

Step 1

Today I have a guest post from Mary who blogs over at Evolve with Mary. Mary is my newest blog friend, I just think she is the cutest in her videos. She definitely shows her true personality and that is something I still need to work on when I take videos. She is also crafty... and loves to talk about health... and, well, she just writes about a lot of things I like to read about. So, let me introduce you to Mary and her DIY Tassel Necklace Tutorial (and VIDEO!) today. Be sure to give her some love in the comments, visit her blog and You Tube channel!! You def. want to know her, she is super hip! :)
I love jewelry. I always admire chunky bracelets, eye-catching rings, dangly earrings, anything that sparkles and shines. Sadly I'm pretty basic when it comes to my jewelry choices. I enjoy understated studs, simple necklaces, and funky rings, which aren't killing it in the fashion department. Sometimes you need to jazz up a maxi dress with a long necklace or enhance the basic white shirt with colorful earrings. Notice I said I don’t wear fun jewelry often. I have rings and shiny things galore. A few years ago I went crazy over H&M jewelry; it's affordable, adorable and unique. Now I'm sitting at my vanity with tons of cool pieces that I just never wear.

I vowed that I would no longer waste money on jewelry, and since I try to keep all vows I make to myself, I’ve decided to make some jewelry instead. Jewelry making is an art. An art at being patient and working with tiny little things you are terrified you will crush, break or lose. I braved the storm and made it to the other side with this fabulous tassel necklace. Now, when I get compliments, I get to flash my award winning smile and say…. I made it myself :)
DIY Tassel Necklace
Cost:
$12
$12
Time:
1 hour
1 hour
Skill Level:
Intermediate
Intermediate
Materials:
Embroidery thread - 3 different colored bundles
Thin beaded necklace
9 mm jump rings
Nylon beading string
scrap cardboard
Instructions:
Step 1
Cut a piece of cardboard 2 inches
Wrap embroidery thread around cardboard
Step 2
Cut 6” piece of embroidery thread
Fold cardboard creating a space between the cardboard and the wrapped thread
Slip cut thread through the space you created
Tie and knotting thread 2-3 times, trim access thread
Remove wrapped thread from cardboard
Step 3
Create a loose knot
Slip tassel into knot creating the base of the tassel and tighten it
Wrap ends of the tied thread around the tassel 5-7 times
Secure thread a tight knot
Step 4
Cut the end of the tassels and trim until they are even
Step 5
Make 2 more tassels following steps 1-5
Step 6
Carefully trim necklace to desired length
String first tassel onto necklace
Add 1 tassel and 10 jump rings, add 1 tassel and 10 jump rings, add last tassel
Step 7
Add 5 jump rings to the before first tassel and after last tassel
Step 8
Use a needle to comb tassels making them fuller
Step 9
Secure necklace with a strong knot

Comments
Post a Comment